This tutorial was written by me on December 12, 2010. It is my own idea and any similarities to another tutorial are purely coincidental. Please do not copy and paste my tutorial ANYWHERE! You can send others to my blog if they'd like to try it.
What you will need to complete this tut
Graphics program of choice. I used PSP9 but this should work well in other versions.
Tube of choice. I am using the adorable artwork of Suzanne Richards, which I purchased at CILM. Please do not use the same without having a proper license. (just a side note: CILM will be going out of business at the end of the month. Get your tubes now!)
Mask: WSL-208 by Chelle. You can download it at her blog. Please leave her a thank you for her generosity! This is the season to be thankful, is it not?
Scrap Kit: I am using a wonderful kit by Tracy from Crafty Delight called :Polar Express:. This one is a cutie! It's full sized so it's suitable for your paper scrapbooking needs, too!
Font of choice. I used PeaAlecia. Just google it. It's a freebie.
Ok, let's go.
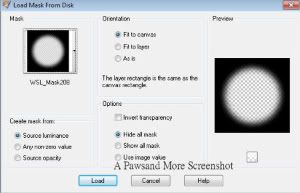
Open a 700 x 700 blank image. Add a layer and fill it with white. Selections, select all. Open paper2 from Tracy's kit. Copy it and add paste it into selection on your working canvas. Select none. Now, apply your mask and merge group.
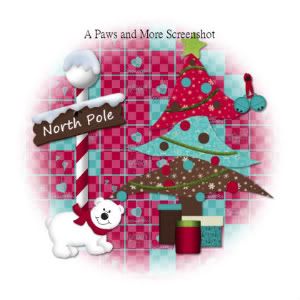
Next, add the Christmas Tree ( DTB-PolarExpress-Tree). Resize by 19%...make sure all layers is NOT checked!. Then resize by 85%.
Open the DBT-PolarExpress_jinglebells. Copy it and paste it onto your canvas. Resize by 38%, three (3) times. Arrange it on the right side of your canvas.
Open DBT-PolarExpress-northpole and copy it and paste it onto your canvas. Resize 58% two (2) times. Move it over to the left side of your canvas.
Open DBT-PolarExpress-PolarBear. Copy it and paste onto your canvas. Resize by 39% and 50%. Image, mirror and move it so it's covering the bottom edge of the sign.
Go back and drop shadow your element layers. I used 2 - 2 - 55 -5.
Here's what mine looks like so far, but feel free to do your own thing!
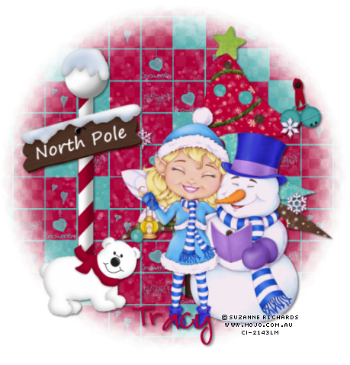
Add your tube of choice and drop shadow it. Position where you want it.
Add your name or text you want to use in your font of choice and drop shadow it. Add your copyright and appropriate license number.
If everything is where you want it and you're happy with your tag, save it as a jpg or close the white background layer at the bottom and save as a png.
Thank you for trying my tutorial! I'd love to see your results. You can send them to me HERE.


No comments:
Post a Comment