This tutorial was written by me on October 2, 2009. Any similarities to another tutorial are purely coincidental. This my own idea. You may text link to my tutorial, but you may not copy and paste it and place it anywhere online. If someone wants to try it, send them to my blog. TY.
For this tutorial, you will need:
Scrap kit of choice. I am using a beautiful free kit from Bel Vidotti called It's fall, which you can get
here.
Mask of choice or the one I used by Weescotslass, mask # 110. You will find her wonderful masks
here.
I am using the adorable art of Suzanne Woolcott, which you can get
here. Please do not use the same tube without the proper license!
Fonts of choice.
To see the full screen shots, you can click on them to view larger.
A note before you get started! When resizing scrap elements, I use smartsize because it doesn't distort them so much! But, the choice is yours.
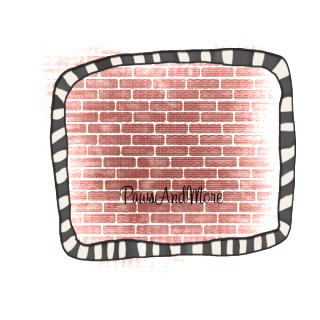
Open a 600x600 transparent image. Copy and past paper 12 as a new layer. Layers, load/save mask and choose WSL105 Right click on the mask layer in the layer palette and go to merge, merge group.
Open element 26. Copy and paste as a new layer above the mask. Image, resize and resize by 65% SMART SIZE. Move to desired position. Add a drop shadow of choice. Image, duplicate, image mirror. Here's what I have so far:

Copy and paste your tube as a new layer. Image resize BICUBIC. I resized 65% again. Add drop shadow of choice.
Open Element 19, which is the owl. Copy & paste as a new layer. Image, resize. I resized by 65% and then by 50% SMARTSIZE. Place to your liking. Add a drop shadow of choice.
Open element 22. Copy and paste as a new layer. Image, resize 10% Smartsize.
Open up the leaves in the kit. Resize them 10% smartsize. I duplicated each one several times and used my deform tool to rotate them until I got the look I wanted. I arranged them all on the left side and then hid all the layers except the leaves. Right click on one of the leaves and go to merge, merge visible and move your merged leaf layer over however far you want it to be. Duplicate and mirror. I did that a few times and moved them into position. After you have all you leaf layers arranged how you want them, making sure all of your other layers are still hidden, merge visible again and drop shadow. Here is what my leaves look like without the rest of the tag.
Add any other elements that you want. I used elements 58, 60 & 67 and resized each one by 35% smart size and moved then into position.All of these layers are positioned under the leaf layer to hide some of the bottom. If you're using the same tube as me, it will also hide the open end of the fence!
Make sure you have everything placed where you want it. Click on your top layer and go to merge, merge visible. If you started out with a white layer to begin with, make sure you hide that before merging if you want a transparent tag! Image resize. I resized by 80% bicubic.
Add your desired text and drop shadow it. Add the proper copyright and license number.
Crop your tag and save as a .png.
Thanks for trying my tutorial!

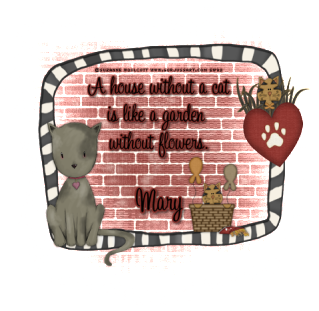
 and squeeze in the left side of the frame a little bit and then drag the node at the top and pull it up a little bit.