
Wow, 2 tuts in one week! lol
Holiday Wishes & Christmas Kisses
This tutorial was written by me on December 14, 2010. It is entirely my own idea and any similarity to another tutorial is purely coincidental.
What you will need:
Tubes of choice: I used the wonderful art of Suzanne Woolcott, which you can buy at her store. Please do not use the same tubes without a valid, legal license. I purchased these when she was with AMI and transferred my license over to a license from her store.
Graphics program of choice: I used PSP9, which I feel is more comfortable but it should work in any version.
The awesome tagger sized kit from StickyKisses called Christmassy Fun. This is a really cute kit and you can purchase it as Crafty Delight. Thanks for letting me use your kit!
Ok, let's go. This is an easy tutorial!
Open a blank 650 x 650 canvas. Select all. Copy a snowflake from the kit. I used Snowflake1. Paste it into selection and selections, select none. Resize 80%. Make sure all layers is UNCHECKED.
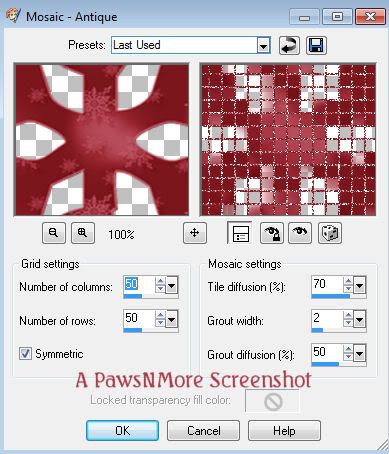
Effects, Mosaic Antique with these settings:
Next, Open SKD_Frame1. Copy and paste it onto your canvas. Take your magic wand (I always have to hide the layers below to get things to select) and click inside the circles of the frame. Don't forget the little area where it overlaps! Selections, modify expand by 3.
Open a paper of choice. I used SKD_Paper20. Copy it and paste it as a new layer on your canvas. Selections invert and hit the delete key on your keyboard. Move that layer under your frame layer.
Take one of your tubes and paste it onto your canvas. Resize as needed. I resized 60%. Move it into position. I duplicated the layer and dragged it above the frame. Erase the parts that need erased on both tube layers. (I wanted to be able to see her hair, that's why I did it this way.)
Copy and paste your other tube and do the same thing as you did with the other one.
Go ahead and drop shadow the BOTTOM tube layers.
Next, open SKD_RibbonBrads. Use your selection tool around one of them. I used the top one. Copy and paste it onto your canvas. Image resize by 60%, Image, rotate 45% right. Move it up on your snowflake so that it looks like it's attached to 2 parts of it. See my tag for reference. Drop shadow. Duplicate it and move it down to under the frame.
Open SKD_Tree2. Copy and paste onto your canvas. Image resize 35% and drop shadow it.
Open SKD_Santa. Copy and paste it onto your canvas. Image resize 45% and move it to where you want it. Drop shadow.
Open SKD_Candy. Copy and paste it onto your canvas. Image resize 25% and drop shadow. I used my eraser brush to erase part of the string that was covering the frame so it looks like it's attached to the frame.
Merge all the layers. Image, resize 80% or you can resize smaller, if you want. Take your crop tool and crop your tag.
Add your text and your name.
Don't forget to add your copyright!
Thank you for trying my tutorial. Please feel free to show me your results. I would love to see them!


(''') (''') I was here today and love your blog. LOL @ the greeting tune. Have fun with that wee one, they grow too fast. She will be going on her first date tomorrow. Well, it will seem like its tomorrow when it happens. LOL. Hugs and ttys........TJ
ReplyDelete