
This tutorial was written by me on August 8th, 2010. It is my own idea and any similarities to any other tutorial are purely coincidental. Please do not copy and paste this tutorial anywhere online. You may provide a text link to my blog so others can try it. Do not claim this as your own tutorial.
What you will need:
Tube of choice: I am using the adorable artwork of Suzanne Woolcott, purchased at gorjussart. Please do not use the same tube without the proper purchase & license!
Scrap kit: This wonderful kit is from TammyJo of CraftyDelight. You will need to purchase this kit but it is so worth it! I am using the tagger sized version of this kit but she does have the same kit available in full sized also! Thanks, sweetie!
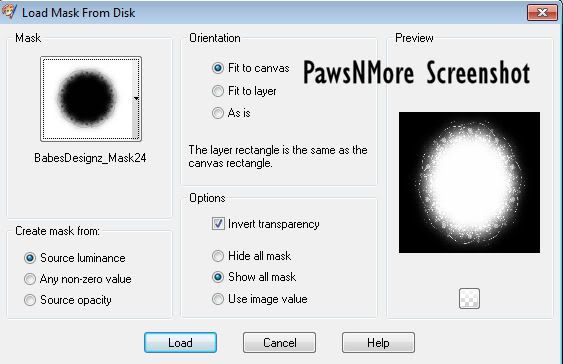
Mask of choice. I'm using one from Babe's Designs. Mask 24. You can find that on her blog.
Font of choice and PSP program of choice. I am using PSP9 but this will work in any version.
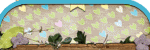
Ok, let's go. Open a blank 600x600 canvas. Layers, new raster layer. Selections, select all. Open paper7 from the kit (or a paper of your choice). See at the top of the paper where it says 66%? We need to resize the paper by 66% Smart Size. Copy it and paste it into your selection on your working canvas. Selections, select none.
Apply your mask with these settings:
Merge, merge group.
Next open the birthday cake. Copy and paste as a new layer on top of your masked layer. Image, resize 30% Smart Size. Move it down your canvas a little bit. Right click on your cake layer in the layer palette and duplicate and go to image resize by 90% Smart Size and move it down a little.
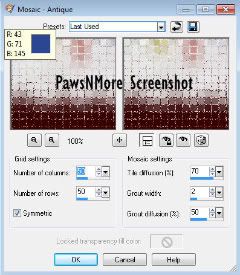
Click on your first cake layer which should be Raster 1. Adjust, adjust blur -- gaussian blur 10%. Go to Effects, texture effects, mosaic antique glass with these settings:
Next add the presents you want to use. I used the blue gift with red trim resized by 20% Smart Size and arranged it over to the left at the bottom. Next, I added gift2, resized by 30% Smart Size and moved it over to the bottom right of my tag.
Next, I copied and pasted the blue curled ribbon and resized it by 50% and then resized it 40%. I moved it over to the left side and dragged that layer just above the raster 1 layer so it's underneath the cake.
Duplicate that layer and go to image, mirror and it will place it on the other side of your canvas.
Open Birthday Blue Bow and copy and paste onto your canvas. Resize it 25% and move it so it's on the curled ribbon (make sure the tails of the bow aren't going to catch fire from the birthday cake LOL)
Copy and paste your tube of choice. I resized mine by 80% Smart Size. Move your tube to your preferred location.
Now, go back and drop shadow all of your layers except your mask layer and your bottom cake layer that we used the mosaic antique glass on. I used 2.2.55.5
Hide the bottom layer and merge visible. Resize if you choose. Add your text with the font of your choice and drop shadow. Don't forget to add the copyright and license number for the tube you used. Crop your tag and save as a .png
Thanks for trying my tutorial! I should have more before too long!
What you will need:
Tube of choice: I am using the adorable artwork of Suzanne Woolcott, purchased at gorjussart. Please do not use the same tube without the proper purchase & license!
Scrap kit: This wonderful kit is from TammyJo of CraftyDelight. You will need to purchase this kit but it is so worth it! I am using the tagger sized version of this kit but she does have the same kit available in full sized also! Thanks, sweetie!
Mask of choice. I'm using one from Babe's Designs. Mask 24. You can find that on her blog.
Font of choice and PSP program of choice. I am using PSP9 but this will work in any version.
Ok, let's go. Open a blank 600x600 canvas. Layers, new raster layer. Selections, select all. Open paper7 from the kit (or a paper of your choice). See at the top of the paper where it says 66%? We need to resize the paper by 66% Smart Size. Copy it and paste it into your selection on your working canvas. Selections, select none.
Apply your mask with these settings:

Merge, merge group.
Next open the birthday cake. Copy and paste as a new layer on top of your masked layer. Image, resize 30% Smart Size. Move it down your canvas a little bit. Right click on your cake layer in the layer palette and duplicate and go to image resize by 90% Smart Size and move it down a little.
Click on your first cake layer which should be Raster 1. Adjust, adjust blur -- gaussian blur 10%. Go to Effects, texture effects, mosaic antique glass with these settings:

Next add the presents you want to use. I used the blue gift with red trim resized by 20% Smart Size and arranged it over to the left at the bottom. Next, I added gift2, resized by 30% Smart Size and moved it over to the bottom right of my tag.
Next, I copied and pasted the blue curled ribbon and resized it by 50% and then resized it 40%. I moved it over to the left side and dragged that layer just above the raster 1 layer so it's underneath the cake.
Duplicate that layer and go to image, mirror and it will place it on the other side of your canvas.
Open Birthday Blue Bow and copy and paste onto your canvas. Resize it 25% and move it so it's on the curled ribbon (make sure the tails of the bow aren't going to catch fire from the birthday cake LOL)
Copy and paste your tube of choice. I resized mine by 80% Smart Size. Move your tube to your preferred location.
Now, go back and drop shadow all of your layers except your mask layer and your bottom cake layer that we used the mosaic antique glass on. I used 2.2.55.5
Hide the bottom layer and merge visible. Resize if you choose. Add your text with the font of your choice and drop shadow. Don't forget to add the copyright and license number for the tube you used. Crop your tag and save as a .png
Thanks for trying my tutorial! I should have more before too long!


Hey girlie Im hapy to see you back here and cleaned some of the dust (LOL) I will try this tut as soon as I download all my Gorjuss tubes cause I lost everything =( But Im happy to see you back!! love ya!
ReplyDeleteClaudia