swag bucks

calendar

Tuesday, December 14, 2010

Holiday Wishes & Christmas Kisses PTU

Photobucket

Wow, 2 tuts in one week! lol

Holiday Wishes & Christmas Kisses

This tutorial was written by me on December 14, 2010. It is entirely my own idea and any similarity to another tutorial is purely coincidental.

What you will need:

Tubes of choice: I used the wonderful art of Suzanne Woolcott, which you can buy at her store. Please do not use the same tubes without a valid, legal license. I purchased these when she was with AMI and transferred my license over to a license from her store.

Graphics program of choice: I used PSP9, which I feel is more comfortable but it should work in any version.

The awesome tagger sized kit from StickyKisses called Christmassy Fun. This is a really cute kit and you can purchase it as Crafty Delight. Thanks for letting me use your kit!

Ok, let's go. This is an easy tutorial!

Open a blank 650 x 650 canvas. Select all. Copy a snowflake from the kit. I used Snowflake1. Paste it into selection and selections, select none. Resize 80%. Make sure all layers is UNCHECKED.

Effects, Mosaic Antique with these settings: Photobucket

Next, Open SKD_Frame1. Copy and paste it onto your canvas. Take your magic wand (I always have to hide the layers below to get things to select) and click inside the circles of the frame. Don't forget the little area where it overlaps! Selections, modify expand by 3.

Open a paper of choice. I used SKD_Paper20. Copy it and paste it as a new layer on your canvas. Selections invert and hit the delete key on your keyboard. Move that layer under your frame layer.

Take one of your tubes and paste it onto your canvas. Resize as needed. I resized 60%. Move it into position. I duplicated the layer and dragged it above the frame. Erase the parts that need erased on both tube layers. (I wanted to be able to see her hair, that's why I did it this way.)

Copy and paste your other tube and do the same thing as you did with the other one.
Go ahead and drop shadow the BOTTOM tube layers.

Next, open SKD_RibbonBrads. Use your selection tool around one of them. I used the top one. Copy and paste it onto your canvas. Image resize by 60%, Image, rotate 45% right. Move it up on your snowflake so that it looks like it's attached to 2 parts of it. See my tag for reference. Drop shadow. Duplicate it and move it down to under the frame.

Open SKD_Tree2. Copy and paste onto your canvas. Image resize 35% and drop shadow it.

Open SKD_Santa. Copy and paste it onto your canvas. Image resize 45% and move it to where you want it. Drop shadow.

Open SKD_Candy. Copy and paste it onto your canvas. Image resize 25% and drop shadow. I used my eraser brush to erase part of the string that was covering the frame so it looks like it's attached to the frame.

Merge all the layers. Image, resize 80% or you can resize smaller, if you want. Take your crop tool and crop your tag.

Add your text and your name.

Don't forget to add your copyright!

Thank you for trying my tutorial. Please feel free to show me your results. I would love to see them!

Sunday, December 12, 2010

Polar Express PTU

Photobucket


This tutorial was written by me on December 12, 2010. It is my own idea and any similarities to another tutorial are purely coincidental. Please do not copy and paste my tutorial ANYWHERE! You can send others to my blog if they'd like to try it.

What you will need to complete this tut

Graphics program of choice. I used PSP9 but this should work well in other versions.

Tube of choice. I am using the adorable artwork of Suzanne Richards, which I purchased at CILM. Please do not use the same without having a proper license. (just a side note: CILM will be going out of business at the end of the month. Get your tubes now!)

Mask: WSL-208 by Chelle. You can download it at her blog. Please leave her a thank you for her generosity! This is the season to be thankful, is it not?

Scrap Kit: I am using a wonderful kit by Tracy from Crafty Delight called :Polar Express:. This one is a cutie! It's full sized so it's suitable for your paper scrapbooking needs, too!
Font of choice. I used PeaAlecia. Just google it. It's a freebie.

Ok, let's go.

Open a 700 x 700 blank image. Add a layer and fill it with white. Selections, select all. Open paper2 from Tracy's kit. Copy it and add paste it into selection on your working canvas. Select none. Now, apply your mask and merge group.
Photobucket

Next, add the Christmas Tree ( DTB-PolarExpress-Tree). Resize by 19%...make sure all layers is NOT checked!. Then resize by 85%.

Open the DBT-PolarExpress_jinglebells. Copy it and paste it onto your canvas. Resize by 38%, three (3) times. Arrange it on the right side of your canvas.

Open DBT-PolarExpress-northpole and copy it and paste it onto your canvas. Resize 58% two (2) times. Move it over to the left side of your canvas.

Open DBT-PolarExpress-PolarBear. Copy it and paste onto your canvas. Resize by 39% and 50%. Image, mirror and move it so it's covering the bottom edge of the sign.

Go back and drop shadow your element layers. I used 2 - 2 - 55 -5.
Here's what mine looks like so far, but feel free to do your own thing!
Photobucket

Add your tube of choice and drop shadow it. Position where you want it.

Add your name or text you want to use in your font of choice and drop shadow it. Add your copyright and appropriate license number.

If everything is where you want it and you're happy with your tag, save it as a jpg or close the white background layer at the bottom and save as a png.

Thank you for trying my tutorial! I'd love to see your results. You can send them to me HERE.

Polar Express PTU

Thursday, December 2, 2010

Hi everyone!~

Sorry I have been MIA for so long! My baby is taking up a LOT of time! Can't believe my little angel is 5 months old already!

I'm going to be working on a tutorial soon! Hopefully it will be done before too long.

Sunday, September 19, 2010

Gorjuss Toil & Trouble, PTU

Photobucket
This tutorial was written by me on September 19th, 2010. It is my own idea and any similarity to another tutorial is purely coincidental. You may save or print my tutorial but please do not copy it and paste it anywhere on the internet.

For this tutorial, you will need the following:

Tube of Choice... I am using the very cute artwork of Suzanne Woolcott. You can purchase her tubes at her store. Please do not use the same tube without the proper license!

Scrap Kit of Choice....I am using a really cute kit called Freakenstein (don't ya just love that name! lol) by Tracy's Designs, which you can buy at Crafty Delight. This kit is just $2 right now and it's full sized and suitable for printing! Thank you, Tracy!

Mask 319 from Tory'sTidBits, which you can download from her blog. It's in zip 13 under masks. Open it in PSP after you've downloaded it.
Font of choice.

PSP, of course. I am using V9 as I find it most comfortable to use but I think this will work with any version.

Ok, on to the tut!

This kit is full sized so it will involve a LOT of resizing! I always resize scrap kits SMART SIZE. There's less distortion doing it that way. Feel free to make this tag your own!

Open a 650x650 image.

Open DBT_Freakenstein_paper8. See where it says 18% at the top? Resize it by 18% to get it to 100%. Copy it and back on your blank canvas, paste as a new layer. Selections, select none.

Layers, new mask layer from image. Find the mask in your dropdown menu and apply with these settings.Photobucket Merge group.

Next, I added DBT_Freakenstein_Splatter2. I resized by 27% and then by 80% and copied and pasted onto my canvas.

Next, open DBT_Freakenstein_Frame3. Resize it to get it to 100% and copy and paste it onto your canvas above your splatter layer. I resized it again by 70%. Make sure all layers is UNCHECKED, otherwise your whole canvas will resize!

Take your magic wand and select inside your frame. (You might have to close the layers below it so it will all select). Selections, modify by 5.. Copy paper 8 again (or use a paper of choice). Copy and paste it as a new layer above your frame. Selections, invert and hit delete on your keyboard. Selections, select none.

Now, you can either go to layers, arrage and move it down or I find it easier to just drag it with my mouse in the layer palette over on the right. However you decide to do it, move the paper under the frame layer.
Now, we're ready to decorate! Here's what I used. DBT_Freakenstein_web, resized 47% and then 30%, DBT_Freakenstein_spider, resized by 30% and 50%. Move it into position on the web.

Next, I added DBT_Freakenstein_flower2 resized by 20% twice. Move it to the upper right of the frame. Duplicate it and arrange to your liking. Open DBT_Freakenstein_flower1 and resize it by 20% twice. Copy and paste it on top of the other flowers. Open DBT_Freakenstein_bow2. Resize 67% and 20%. Copy and paste it on top of your flower pile.

Next, open DBT_Freakenstein_sequin5 and resize it by 50%. Move it up so it's under the web. Drag your layer down so it's right above your frame. Next I added DBT_Freakenstein_Crow and resized it accordingly. Place it on top of your frame. I resized the DBT_Freakenstein_haybale by 58% and 20% and moved it down to the bottom of my frame.

Add your tube, resizing as needed and place it on the hay bale. Go through and drop shadow everything except the splatter and mask layers.

Merge all of your layers and resize your tag. I resized by 75% and cropped to layer opaque to get rid of the excess background.

Add your text and name. Don't forget to add your license number and credits!

You're all done...pretty easy, huh?

If you would like to share your results with me, I would love to see them!

Saturday, August 21, 2010

Gorjuss Song In my Heart PTU


Photobucket

Hello, everyone! Another new tutorial for you all. I absolutely love fall! The colors, the crisp air and the bright blue skies. This kit inspired me to make a tag and I wanted to write it up.
This tutorial was written by me on August 21, 2010. Any similarity to another tutorial online is purely a coincidence. It is my own idea.
To complete this tutorial, you will need:

A fall tube of choice. I am using the incredibly cute artwork of Suzanne Woolcott, which you will find at her store. Please do not use the same tube without having legally purchased the tube! Artists need to make a living, too, right?

Template : "Goth At Heart" from dreamslanddesigns. You can find that on her blog HERE. Don't forget to leave a note when you download and take a look at all the other wonderful offerings she has on her blog!
Mask: I am using one from Babe's Designz, Mask 6, which you can find on her blog. Again, please don't forget to leave a thank you!

The beautiful scrap kit called "Autumn Music" by TC's Sweets. You can find it HERE and it's only 2.00, which is a bargain! Love this kit. Thanks, Sweetie for letting me use your kit!
Fonts of your choice.
PSP, of course. I believe this can be done in any version, however I am using PSP9.

Ready? Let's go!
Open your template. Shift D to duplicate it and then close the original. Hide your bottom white layer or just delete it, it's your choice. I usually just close the eye on the layers and delete them at the end.

Click on 1. Selections, select all. Selections, float, selections, defloat. Open up your kit and open up one of the papers. I used TCS-Augumn Music-Papers-013. Copy your paper and back on your template, paste it as a new layer. Selections, invert and hit delete on your keyboard. Now you can hide the 1 layer or you can delete it. Moving on to the next layer up, which is 2. Selections, select all, selections, float, selections, defloat and paste another paper of choice. I'm using paper 023. Selections, invert and tap the delete key on your keyboard.

Layer 3 and the Dot Frame, I just left as they were. Moving on up to the frame background layer. Repeat the same steps we did before, using another paper of choice. I used paper 012.

For the hearts...Click with your dropper tool to pick a color for your background and click to make black your foreground in your color palette. Go to Adjust, Color Balance, Manual Color Correction with these settings:
Photobucket

Do the same with the other 2 hearts or you can leave them all as they are...the choice is yours.

I hid the tag layer on the template but you could do a color correction on it if you want.
Click on Layer 1 and go to layers, new raster layer. Selections, select all. Selections, float and defloat. Copy and paste a paper into your selection. I used the same paper that I used on the top layer of my template. Selections, select none. Layers, Load/Save Mask from Disk. Use the drop down box to find the babe designz mask and apply it with these settings:

Photobucket

Right click on the mask layer and go to merge, merge group.


Add your tube as a new layer. Drag that layer to the top of your layer palette. Place it where you want and drop shadow it. I used 2.2.55.5 (which is my standard drop shadow!)
Add any elements you desire, resizing (remember to always use Smart Size when resizing scrap elements!) and drop shadowing them as you go. I used the a butterfly, a ribbon, the bead string. and a music note.
Add your text and don't forget to add your credits/license number.
You can resize now...resize all layers and crop it to get rid of the excess canvas. Save your brand new tag!

Thanks for trying my tutorial. I hope it was easy to follow. I'd love to see your results, if you would care to show me!

Sunday, August 15, 2010

Link Changed for Crafty Delight!

Crafty Delight scrap store has a new URL so I changed it in my post before this one to reflect the change. You can now find the store at http://www.craftydelight.com

Sunday, August 8, 2010

Gorjuss Birthday Greetings PTU

Photobucket


This tutorial was written by me on August 8th, 2010. It is my own idea and any similarities to any other tutorial are purely coincidental. Please do not copy and paste this tutorial anywhere online. You may provide a text link to my blog so others can try it. Do not claim this as your own tutorial.

What you will need:
Tube of choice: I am using the adorable artwork of Suzanne Woolcott, purchased at gorjussart. Please do not use the same tube without the proper purchase & license!

Scrap kit: This wonderful kit is from TammyJo of CraftyDelight. You will need to purchase this kit but it is so worth it! I am using the tagger sized version of this kit but she does have the same kit available in full sized also! Thanks, sweetie!

Mask of choice. I'm using one from Babe's Designs. Mask 24. You can find that on her blog.
Font of choice and PSP program of choice. I am using PSP9 but this will work in any version.

Ok, let's go. Open a blank 600x600 canvas. Layers, new raster layer. Selections, select all. Open paper7 from the kit (or a paper of your choice). See at the top of the paper where it says 66%? We need to resize the paper by 66% Smart Size. Copy it and paste it into your selection on your working canvas. Selections, select none.

Apply your mask with these settings:
Photobucket


Merge, merge group.
Next open the birthday cake. Copy and paste as a new layer on top of your masked layer. Image, resize 30% Smart Size. Move it down your canvas a little bit. Right click on your cake layer in the layer palette and duplicate and go to image resize by 90% Smart Size and move it down a little.

Click on your first cake layer which should be Raster 1. Adjust, adjust blur -- gaussian blur 10%. Go to Effects, texture effects, mosaic antique glass with these settings:

Photobucket
Next add the presents you want to use. I used the blue gift with red trim resized by 20% Smart Size and arranged it over to the left at the bottom. Next, I added gift2, resized by 30% Smart Size and moved it over to the bottom right of my tag.

Next, I copied and pasted the blue curled ribbon and resized it by 50% and then resized it 40%. I moved it over to the left side and dragged that layer just above the raster 1 layer so it's underneath the cake.
Duplicate that layer and go to image, mirror and it will place it on the other side of your canvas.

Open Birthday Blue Bow and copy and paste onto your canvas. Resize it 25% and move it so it's on the curled ribbon (make sure the tails of the bow aren't going to catch fire from the birthday cake LOL)
Copy and paste your tube of choice. I resized mine by 80% Smart Size. Move your tube to your preferred location.
Now, go back and drop shadow all of your layers except your mask layer and your bottom cake layer that we used the mosaic antique glass on. I used 2.2.55.5

Hide the bottom layer and merge visible. Resize if you choose. Add your text with the font of your choice and drop shadow. Don't forget to add the copyright and license number for the tube you used. Crop your tag and save as a .png

Thanks for trying my tutorial! I should have more before too long!

Thursday, April 22, 2010

Hello everyone!

Hi everyone! Gosh, it's been a long time since I've even stopped in here! Sorry. We've got a baby due the beginning of July so we've been busy getting ready for that but I am going to attempt to write a new tutorial soon. I just need to find a kit that inspires me first!

Hope everyone is doing well and having a great Spring so far!

Hugs!

Friday, October 16, 2009

New shoppe in town!


Come and check out the brand new store. There are lots of great items and many grand opening deals!

You can visit it here:

Wednesday, October 14, 2009

Gorjuss Alley Cat (FTU)

Photobucket

Gorjuss Alley Cat

This tutorial was written by me on October 14, 2009 and named by my husband lol. It is entirely my own idea and any similarities to any other tutorial are pureply coincidental. Please do not copy and paste my tutorial. Send people to my blog if they want to try it. Thank you! You can click on my images to make them full sized.

I am using the adorable artwork of Suzanne Woolcott, which you can get at her store, GorjussArt. Please do not use the same without the proper license (purchase)!

Mask of choice, or the one I'm using by WSL, mask81, which you can get here. She has a lot of very nice masks that she freely provides for our use. If you don't already have this in your collection, be sure to leave her some love!

FTU scrap kit by SkyScraps called Maxou, which she made in memory of her cat who recently passed away. You can download it at her blog and leave a thank you!

Font of choice. I used SweetheartScript-Limited.

For any of you who know me, you know I have a strong love of cats. We have 5 of the furry room mates!

Here we go.

Start with a 600x600 transparent canvas. Selections, select all to get the marching ants going around the edges of the canvas.

Open Paper1. Copy and then paste it into selection on your working canvas. Selections, select none. Apply your mask of choice. I used WSL_Mask 81. Right click on your mask layer on your layer palette and merge, merge group. Ok let's start building your tag.

Open up Frame 1. Copy and paste it as a new layer on top of your mask layer. Take your deform toolPhotobucket and squeeze in the left side of the frame a little bit and then drag the node at the top and pull it up a little bit.

Decorate your tag any way you want to! I used the Kitty Heart and copied and pasted it onto the right side of the frame. Open element 12 and resize it 30% Smart size. Copy and paste it over the heart and drag that layer down in your layer palette so the bottom edge of the cat grass is under the heart.

Open either element 7 or 8. It's your choice. Resize 40% Smart size and place it on top of the kitty grass and under the heart. Take your eraser brush and erase the tiny bit of the stem that is hanging out of the lower part of the heart.

Open element1. Resize by 30% smart size. Copy and paste it so it's sitting on the bottom edge of the frame opening.

Photobucket

Add anything else you want to. I took one of the word art phrases from the kit and just typed it out myself.

Add your tube and resize it to fit.

Go back through and add a drop shadow to all the layers except the mask layer. My standard drop shadow is 2 , 2, 55, 5 .

Go ahead and merge everything if you are happy with it. Image resize and resize by 80% BICUBIC. Use your crop tool, crop to layer opaque. Now, add your copyright and license number if applicable. Save as a .png.

Thank you for trying my tutorial. I hope you enjoyed it!

Friday, October 2, 2009

Gorjuss Fall -- FTU

Photobucket

This tutorial was written by me on October 2, 2009. Any similarities to another tutorial are purely coincidental. This my own idea. You may text link to my tutorial, but you may not copy and paste it and place it anywhere online. If someone wants to try it, send them to my blog. TY.

For this tutorial, you will need:

Scrap kit of choice. I am using a beautiful free kit from Bel Vidotti called It's fall, which you can get here.

Mask of choice or the one I used by Weescotslass, mask # 110. You will find her wonderful masks here.

I am using the adorable art of Suzanne Woolcott, which you can get here. Please do not use the same tube without the proper license!

Fonts of choice.

To see the full screen shots, you can click on them to view larger.

A note before you get started! When resizing scrap elements, I use smartsize because it doesn't distort them so much! But, the choice is yours.

Open a 600x600 transparent image. Copy and past paper 12 as a new layer. Layers, load/save mask and choose WSL105 Right click on the mask layer in the layer palette and go to merge, merge group.

Open element 26. Copy and paste as a new layer above the mask. Image, resize and resize by 65% SMART SIZE. Move to desired position. Add a drop shadow of choice. Image, duplicate, image mirror. Here's what I have so far:Photobucket
Copy and paste your tube as a new layer. Image resize BICUBIC. I resized 65% again. Add drop shadow of choice.

Open Element 19, which is the owl. Copy & paste as a new layer. Image, resize. I resized by 65% and then by 50% SMARTSIZE. Place to your liking. Add a drop shadow of choice.

Open element 22. Copy and paste as a new layer. Image, resize 10% Smartsize.

Open up the leaves in the kit. Resize them 10% smartsize. I duplicated each one several times and used my deform tool to rotate them until I got the look I wanted. I arranged them all on the left side and then hid all the layers except the leaves. Right click on one of the leaves and go to merge, merge visible and move your merged leaf layer over however far you want it to be. Duplicate and mirror. I did that a few times and moved them into position. After you have all you leaf layers arranged how you want them, making sure all of your other layers are still hidden, merge visible again and drop shadow. Here is what my leaves look like without the rest of the tag.Photobucket
Add any other elements that you want. I used elements 58, 60 & 67 and resized each one by 35% smart size and moved then into position.All of these layers are positioned under the leaf layer to hide some of the bottom. If you're using the same tube as me, it will also hide the open end of the fence!

Make sure you have everything placed where you want it. Click on your top layer and go to merge, merge visible. If you started out with a white layer to begin with, make sure you hide that before merging if you want a transparent tag! Image resize. I resized by 80% bicubic.

Add your desired text and drop shadow it. Add the proper copyright and license number.

Crop your tag and save as a .png.

Thanks for trying my tutorial!

Sunday, September 20, 2009

New layout!

Hey, did you notice? I just changed my layout. Isn't it cute? My friend Tracy made it. She has very cute blog layouts for sale...you can go HERE to check out her awesome stuff!

Sunday, June 28, 2009

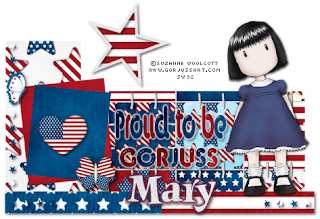
Proud 2 Be Gorjuss


This tutorial was written by me on June 28, 2009. It is entirely my own idea and any similarities to any other tutorial is purely coincidental.

What you will need: Scrap kit of choice, preferrably Red White & Blue. I am using the gorgeous FTU kit by Monti. You can find it at her site HERE. Click the bears to enter the site and then click on Scrap Kits. It's called BigBangBoom-BlogTrain-Kit.

Template: I am using template 3 by Stayyseee Productionzz. You can find that HERE.

Tube and font of choice. I am using the adorable artwork of Suzanne Woolcott. You can find it at her store HERE. Please do not use the same tube without a valid PURCHASED license.

My word art or make your own. I have posted mine here. It is saved as a png with a transparent background. Right click to save it to your computer. Photobucket


Ok Let's go.

Open your template. ShiftD to duplicate it and close the original. Image resize, and resize 80% Bicubic. Delete the top layer. Click on the layer called Dark Gray Rectangle to make it active in your layer palette. Selections, select all, selections float and paste a paper of choice. I used the Patchwork paper. Copy and paste onto your canvas. Selections, invert and hit delete on your keyboard. Selections, select none. You can now either delete the original layer or close the eye to hide it.

Go to the next layer up and repeat the steps as before. I used StarsNStripes-White. Keep repeating all of that until you have your layers covered with a paper.

For the white square, I used the Red Paper
For the black square, I used the blue paper.
For the white stars layer, I used the blue paper with the stars on it.
I also used the same paper on BOTH of the black stars layers.
The next layer is the Gray Star. Selections, select all, selections float, defloat. Open up the Stripes1 paper, but resized it to 60%. Copy and paste it on top of your selected star.Selections invert and hit delete. Make sure when you close that paper that you click NO when it asks if you want to save the changes to it!
On the star frame, I used the white paper.

Unhide the Gray Stripe layer, and add a paper of choice to it. I used the Flag paper and moved it up so the stars were showing in my selection before I did the selection, invert, selection delete.

I then added the heart out of the kit, resized 30% SMART SIZE and then 50% smart size. Place it over on your blue square.

Add any other pieces from the scrap kit that you want. I used a couple of butterflies, resized as above.

Go back through and give each layer a drop shadow. I am using V&H 2, Opacity 55 Blur 5.

Here's what mine looks like so far: Photobucket


Next add your tube of choice. I resized mine 60% BICUBIC. Place where you like and add a drop shadow. I used 1, 1, 100, 5 to make her stand out a little bit.


For the text, I put the blue and white papers in my foreground and background and typed each letter in a different color. Takes a little bit of time but it's not hard to do. I have included my text layer. You can get it above.

Add your name in a font of choice. I used A&S Jiggy Roman, which is a pay font so I can't supply it. I also used the white paper in the background and foreground null. Add a drop shadow and a gradient glow. I used both the red and blue from the papers for the glow.


Use your crop tool to get rid of the excess. If you resized at the beginnins, you shouldn't need to resize again. Add your copyright. Make sure it's legible. I a small white gradient glow using EyeCandy 4000 to make it stand out.

Hide your white background and save as a png.

Thanks for trying my tut. I hope you found it easy to follow.

Sunday, June 14, 2009

New tutorial: Gorjuss Magic

Photobucket

You can click on my screen shots to make them larger.

This tutorial was written by me on June 14, 2009. It is my own idea and any similarities to another tutorial are purely coincidental. Please do not copy and paste it anywhere online. You may link to my blog for groups.

For this tutorial, I am using the awesome artwork of Suzanne Woolcott.
You can purchase it at her
store. Please DO NOT use the same without a
license!
Scrap kit from Jessica. If is available
HERE. This kit has been
around for a little while but it's just beautiful!
Tube and font of choice. I used SnootyFox NF, which I can't supply.
Eye Candy 4000 - Gradient glow.


Open a 600x600 image. Flood fill white so you can see what you're doing.

Open Frame3 from the kit. Copy and paste it onto your canvas. Click
inside it with you magic wand. Selections, modify and expand by 5.

Open a paper of choice. I used Paper 24. Copy and paste on top of your frame layer. Selections, invert and hit delete on your keyboard. Drag the paper layer under your frame layer in your layer palette. Selections, select none.

Copy and paste your tube of choice. Duplicate it and move it down
under your frame.

Click inside the frame again with your magic wand. Selections, modify
but by 3 this time. Selections, invert and make your top tube layer
active. Use your eraser brush to erase whatever part of the tube is
outside your selection. Don't worry...with the selection there, it
won't let you erase too much!

Add a drop shadow to your BOTTOM tube and your frame. If you
dropshadow the tubethat you erased from, you will be able to tell you
deleted!

At this time, I hid my bottom layer and went to merge, merge visible.
This way it won't resize the bottom layer! Image, resize by 80%, all
layers UNCHECKED. Now you should have something like this Photobucket

New you can add your embellishments of choice. I used the
fairydusttrail_JD. Paste as a new layer. Duplicate, Image mirror and
image flip. Merge those 2 layers together and drag it down underneath
your merged layer.

Add the SF Wordart. I gave this a fat gradient glow with a color from my tube with these settings:

Photobucket Photobucket

New, paste the flower branch1 and resize by 60%, all layers unchecked.
Image, flip and move it so there's just a little showing at the bottom.
Right click on that layer in your layer palette and duplicate, mirror.
Merge the 2 layers together and drag it down under the sparkle trail
layer.

You can no merge visible again, but make sure your bottom layer is
hidden. Image, resize and resize by 80% all layers UNCHECKED.
Add your copyright and your name. I added gradient glow to my name but
size 3.

You can now crop your tag to get rid of the excess white.

If you want a transparent background, keep your white layer hidden and
save as a PNG. Thanks for trying my tutorial!

Saturday, June 13, 2009

American Spirit


Since I am no longer selling scrap kits, I've decided to offer them for download to whomever wants them. I have more and I will get them up as time allows.


My Amerian Spirit kit can be downloaded HERE.
Hugs!

My Folder of Extra Tags

Here is a link to my Fotki where there are several folders of extras of tags that I have made for my group using the art of Suzanne Woolcott. These are free to snag, as long as you do not alter them in any way.

You will find that folder HERE.

Saturday, May 23, 2009

New Kitty Pack out at Gorjuss Art!

Hey, everyone! Suzanne Woolcott has just released an adorable pack of kitties! I looooooove kitties, and I have the cat hair here at home to prove it! LOL Why not pick these up and not only support an awesome artist, but purchase them so you can make some cute stats or tags for your buds!

www.gorjussart.com