This tutorial was written by me on September 19th, 2010. It is my own idea and any similarity to another tutorial is purely coincidental. You may save or print my tutorial but please do not copy it and paste it anywhere on the internet.
For this tutorial, you will need the following:
Tube of Choice... I am using the very cute artwork of Suzanne Woolcott. You can purchase her tubes at her store. Please do not use the same tube without the proper license!
Scrap Kit of Choice....I am using a really cute kit called Freakenstein (don't ya just love that name! lol) by Tracy's Designs, which you can buy at Crafty Delight. This kit is just $2 right now and it's full sized and suitable for printing! Thank you, Tracy!
Mask 319 from Tory'sTidBits, which you can download from her blog. It's in zip 13 under masks. Open it in PSP after you've downloaded it.
Font of choice.
PSP, of course. I am using V9 as I find it most comfortable to use but I think this will work with any version.
Ok, on to the tut!
This kit is full sized so it will involve a LOT of resizing! I always resize scrap kits SMART SIZE. There's less distortion doing it that way. Feel free to make this tag your own!
Open a 650x650 image.
Open DBT_Freakenstein_paper8. See where it says 18% at the top? Resize it by 18% to get it to 100%. Copy it and back on your blank canvas, paste as a new layer. Selections, select none.
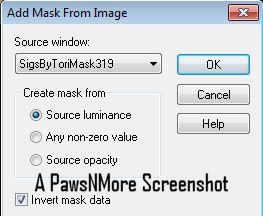
Layers, new mask layer from image. Find the mask in your dropdown menu and apply with these settings.
 Merge group.
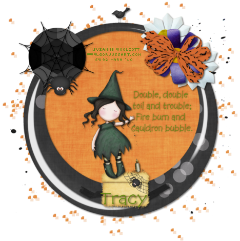
Next, I added DBT_Freakenstein_Splatter2. I resized by 27% and then by 80% and copied and pasted onto my canvas.
Next, open DBT_Freakenstein_Frame3. Resize it to get it to 100% and copy and paste it onto your canvas above your splatter layer. I resized it again by 70%. Make sure all layers is UNCHECKED, otherwise your whole canvas will resize!
Take your magic wand and select inside your frame. (You might have to close the layers below it so it will all select). Selections, modify by 5.. Copy paper 8 again (or use a paper of choice). Copy and paste it as a new layer above your frame. Selections, invert and hit delete on your keyboard. Selections, select none.
Now, you can either go to layers, arrage and move it down or I find it easier to just drag it with my mouse in the layer palette over on the right. However you decide to do it, move the paper under the frame layer.
Now, we're ready to decorate! Here's what I used. DBT_Freakenstein_web, resized 47% and then 30%, DBT_Freakenstein_spider, resized by 30% and 50%. Move it into position on the web.
Next, I added DBT_Freakenstein_flower2 resized by 20% twice. Move it to the upper right of the frame. Duplicate it and arrange to your liking. Open DBT_Freakenstein_flower1 and resize it by 20% twice. Copy and paste it on top of the other flowers. Open DBT_Freakenstein_bow2. Resize 67% and 20%. Copy and paste it on top of your flower pile.
Next, open DBT_Freakenstein_sequin5 and resize it by 50%. Move it up so it's under the web. Drag your layer down so it's right above your frame. Next I added DBT_Freakenstein_Crow and resized it accordingly. Place it on top of your frame. I resized the DBT_Freakenstein_haybale by 58% and 20% and moved it down to the bottom of my frame.
Add your tube, resizing as needed and place it on the hay bale. Go through and drop shadow everything except the splatter and mask layers.
Merge all of your layers and resize your tag. I resized by 75% and cropped to layer opaque to get rid of the excess background.
Add your text and name. Don't forget to add your license number and credits!
You're all done...pretty easy, huh?
If you would like to share your results with me, I would love to see them!


